Quick answers
It won't power on
Possible causes include the main power switch, a depleted battery, or a loose battery connection. Confirm that the battery is fully charged and connected, then check for flashes from the power lights to confirm that power is reaching the motherboard.
The remote isn't responding
Check that the Keypad Lock is not engaged. To release it, press the Keypad Lock button (the bottom-right padlock symbol), then press any other remote button.
Which bracket do I need?
Brackets are cart-specific. Search your brand and model in the Compatibility Finder.
The cart pulls to one side
Switch the gyroscope on — press "G" so the amber Gyro light is lit. Check whether the cart has a trim adjustment on the front wheel. If it still pulls, make sure the clamps and bolts are secure and unobstructed.
Nothing here fits? Go to Troubleshooting, or contact us: contact@alphardgolf.com / 1 (302) 488-0774 (Mon–Fri 10 AM–6 PM ET).
What's in the Box
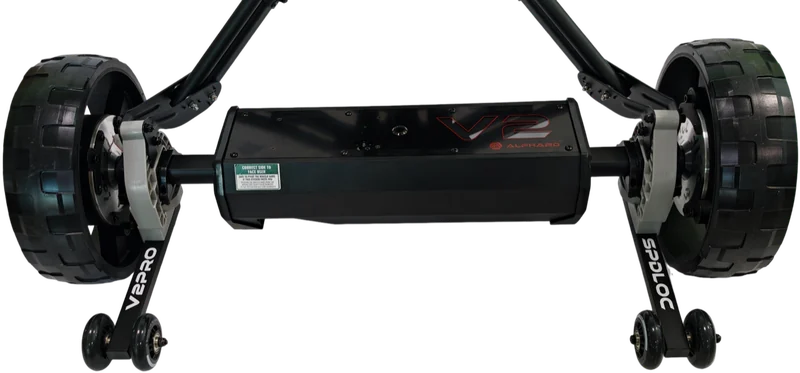
Before your first use, read this guide in full and check that all components are present. Your Club Booster V2Pro ships pre-assembled with the Speedlock quick-release system.
Club Booster V2Pro
The main power unit, pre-assembled with the Speedlock quick-release system.
Cart-Specific Brackets Optional
With (4) bolts, (4) washers and (4) nuts. Brackets are specific to your cart brand and model, and install once on your push cart.
Light-Gray Speedlock Clamps
Non-directional clamps that lock the Club Booster onto the cart brackets. A spare set is packed in the accessory carton — if your cart bracket still carries the older black clamps, you can swap them for these.
Remote Controller & Mount
Drives the cart wirelessly. Includes the remote mount with O-ring.
ACDC Charger
Use only the supplied charger. The metal dust cover is part of the battery, not the charger — replace it over the battery charging inlet after charging.
Micro USB Charging Cord
For charging the remote controller. The remote has its own rechargeable battery — if the buttons stop working, charge it before assuming a pairing fault.
Quick Start Guide
Printed quick-reference for first setup.
Important Current units ship with light-gray clamps and limit block, which fit either way round. These are not compatible with the black clamps used on the original V2Pro, which are directional and marked "L" and "R". If you are ordering replacements, match the colour already on your unit, or email contact@alphardgolf.com with a photo and we will confirm.
Check first Brackets are cart-specific — make sure the brand and model on the box match your push cart. Use care not to pinch your fingers when connecting the Club Booster to your cart.
Video Library
Every Club Booster V2Pro video in one place. Play it here, or jump to the written steps.
Accessories These cover optional add-ons rather than the Club Booster itself, and some were filmed on an earlier Club Booster. If your V2Pro looks different from the video, email contact@alphardgolf.com before fitting.
Bag Boy Swivel Conversion Kit (SWIKIT-BB): Use the illustrated installation guide below instead of a video.
Upgrade kit only Your Club Booster V2Pro already has the Speedlock system fitted at the factory. These four videos are only for owners fitting the Speedlock Upgrade Kit to an older Club Booster. Note: Current V2Pro models do not require the stopper plate or end-cap stiffeners shown in these videos.
Setting Up the V2Pro with the Omni Cart Bundle (2024 V2 version)
Written steps ↓Clicgear (3-Wheel Model) (V1 version)
Written steps ↓Rovic RV1S / RV1C (V1 version)
Written steps ↓Sun Mountain Speed Cart (V1 version)
Written steps ↓Sun Mountain Micro Cart (V1 version)
Written steps ↓BagBoy Quad XL & Compact 3 (V1 version)
Written steps ↓BagBoy Tri-Swivel (V1 version)
Written steps ↓CaddyTek & TourTrek (3-Wheel 360) (V1 version)
Written steps ↓Installing the Pro Bracket on a BagBoy Nitron
Written steps ↓Installing the Pro Bracket on a CaddyTek CaddyLite Auto+ 360
Written steps ↓Using the Controller & Remote (2024 V2 version)
Written steps ↓Pairing the Remote
Written steps ↓Upgrade Kit Step 1 - Replacing the Clamps (black-clamp version)
Upgrade kit onlyUpgrade Kit Step 2 - Stopper Plate (black clamps; not for current V2Pro)
Upgrade kit onlyUpgrade Kit Step 3 - Stiffeners (black clamps; not for current V2Pro)
Upgrade kit onlyUpgrade Kit Step 4 - Installing the Wheelie Bars (black-clamp version)
Upgrade kit onlyClicgear 4.0 Seat Attachment - Part 1 (2024 V2 version)
AccessoryClicgear 4.0 Seat Attachment - Part 2 (2024 V2 version)
AccessoryRovic Seat Installation (2024 V2 version)
AccessorySidekick - Mounting & Pairing the Remote (2024 V2 version)
AccessoryClicgear Swivel Kit Installation (older SWIKIT shown; new T-bracket not shown)
AccessoryTether Follow System (TFS) — Pairing
AccessoryTether Follow System (TFS) — Center Position Recalibration
AccessoryUsing the Alphard Golf App: Pairing, Firmware Update & Password Reset
Written steps ↓No video for your cart? The bracket steps are the same for every cart — see Installing the Brackets and the Compatibility Finder.
Charging the Battery
The battery ships at a very low charge. Charge for at least 5 hours before your first round so it lasts the full 18 holes.
- Match the recess on the charging plug to the stud on the charging inlet, then push the plug straight in.
- The LED turns red when charging begins.
- When complete, the LED changes from red to green.
- A full charge takes about 4 hours from a low level.
- You can check the battery level by pressing the Power Button while charging.

Charging & care
- Use only the manufacturer-supplied charger. Input 100–240 VAC, 50/60 Hz. Output 42 VDC, 1.5 A max.
- Charge between 10–30°C (50–86°F). Charging below 10°C / 50°F may damage the battery cells.
- Always replace the metal dust cover on the battery charging inlet after charging to protect the inlet from corrosion or damage.
- Unplug the charger once charging is complete. This prolongs battery life.
- Don't charge overnight on a regular basis. Do so only if Alphard Customer Services recommends it to address a specific issue.
- Don't charge outdoors. Store at normal room temperature in a dry place, out of direct sunlight.
Charging video
Installing the Brackets
Brackets are specific to a cart brand and model. Confirm the brand and model on the box match your cart before installing — see the Compatibility Finder.
Tools you'll need
Phillips screwdriver, and an open-end, adjustable, or socket wrench (for the wheel nut, strut pivot nut, and bracket nut).
Before you start
If your push cart has a rear-wheel braking mechanism, remove it before removing the rear wheels.
- Remove the rear wheels from your push cart.
- Remove the original wheel brackets, exposing the rear wheel struts.
- Align the holes on each rear wheel strut with the Alphard bracket. Fasten each bracket with a bolt, nut and washer. The opening of the C-shaped axle clamp should face away from the cart.
- Check that both brackets and all wheel nuts are tight before positioning the cart on the V2Pro and securing it by rotating the wheelie bars into place.
Bracket installation videos (by cart model)
Find your cart, then follow along. These videos were filmed with the Clamp Assembly rather than the Pro Clamp — the installation is the same either way.
Clicgear (3-Wheel Model) (V1 version)
Rovic RV1S / RV1C (V1 version)
Sun Mountain Speed Cart (V1 version)
Sun Mountain Micro Cart (V1 version)
BagBoy Quad XL & Compact 3 (V1 version)
BagBoy Tri-Swivel (V1 version)
CaddyTek & TourTrek (3-Wheel 360) (V1 version)
Installing the Pro Bracket on a BagBoy Nitron
Installing the Pro Bracket on a CaddyTek CaddyLite Auto+ 360
Stopper Plate Adjustment
The small metal stopper plate on the axle limits how far the V2Pro opens. Setting it correctly lets the extension tube stop at the right width for your cart. The default is position #4, the widest extension setting.
| Position | Known compatible push carts |
|---|---|
| #1 | Sun Mountain Micro Cart; BagBoy Quad; Axglo; BigMax Cube |
| #2 | Sun Mountain Speed Cart; Fastfold |
| #3 | Clicgear 8.0 / 8+; Omni Cart |
| #4 | Clicgear 2.0–4.5; Rovic RV1S; CaddyLite EZ; BagBoy Nitron, Compact 3 and Tri-Swivel |

How to adjust the extension limit
If your cart is not listed, or the current position does not fit:
- Remove the stopper-plate screw with a Phillips screwdriver.
- Hold the stopper in place and move the extension tube until it reaches the best position for your cart.
- Align the required marker position, then reinsert and tighten the screw to secure the plate.


Finding the right position When the axle tube is fully extended, the C-shaped clamp assemblies should sit comfortably over the wheelie-bar mounts. If you are unsure, start at position #4, the widest setting, and work downwards until the cart fits securely.
Bracket Compatibility Finder
Search by push-cart brand or model to identify the bracket needed to attach the V2Pro. Select that bracket when adding the V2Pro to your shopping cart. The brackets in the box should then match your push cart — if they do not, contact us before installing. (Compatibility list v2025/06.)
| Brand | Model | Bracket to select |
|---|---|---|
| Alphard Golf | Omni Cart | Bracket already installed — no bracket to choose |
| Alphard Golf | Duo Cart | Alphard Duo |
| Axglo | Flip n' Go Pro | Axglo |
| Axglo | V3 | Axglo |
| Axglo | V2 | Axglo |
| BagBoy | Compact 3 | Bagboy Nitron / Quad XL / Tri-Swivel |
| BagBoy | Nitron | Bagboy Nitron / Quad XL / Tri-Swivel |
| BagBoy | Quad XL | Bagboy Nitron / Quad XL / Tri-Swivel |
| BagBoy | Tri-Swivel | Bagboy Nitron / Quad XL / Tri-Swivel |
| BagBoy | Tri-Swivel II | Bagboy Nitron / Quad XL / Tri-Swivel |
| BigMax | Cube | Bigmax IQ |
| BigMax | IQ | Bigmax IQ |
| BigMax | IQ 360 | Bigmax IQ |
| BigMax | IQ² | Bigmax IQ |
| BigMax | IQ² 360 | Bigmax IQ |
| CaddyTek | 360 | CaddyTek / TourTrek (NOT Auto+ 360) |
| CaddyTek | 1-Click 4-Wheel | CaddyTek / TourTrek (NOT Auto+ 360) |
| CaddyTek | Caddy Cruiser One Tour | CaddyTek / TourTrek (NOT Auto+ 360) |
| CaddyTek | Caddy Cruiser ONE V8 | CaddyTek / TourTrek (NOT Auto+ 360) |
| CaddyTek | CaddyLite Auto+360 | CaddyTek / TourTrek (Auto+360) (New) |
| CaddyTek | CaddyLite EZ Tour | CaddyTek / TourTrek (NOT Auto+ 360) |
| CaddyTek | CaddyLite EZ Version 8 | CaddyTek / TourTrek (NOT Auto+ 360) |
| CaddyTek | CaddyLite ONE Swivel V8 | CaddyTek / TourTrek (NOT Auto+ 360) |
| CaddyTek | Explorer V8 SuperLite | CaddyTek / TourTrek (NOT Auto+ 360) |
| CaddyTek | EZ Fold | CaddyTek / TourTrek (NOT Auto+ 360) |
| CaddyTek | Leopard | CaddyTek / TourTrek (NOT Auto+ 360) |
| CaddyTek | Panther | CaddyTek / TourTrek (NOT Auto+ 360) |
| CaddyTek | The Explorer Version 8 | CaddyTek / TourTrek (NOT Auto+ 360) |
| Clicgear | 2.0 | Clicgear (LARGE Fixed Front Wheel) |
| Clicgear | 3.0 | Clicgear (LARGE Fixed Front Wheel) |
| Clicgear | 3.5 | Clicgear (LARGE Fixed Front Wheel) |
| Clicgear | 4.0 | Clicgear (LARGE Fixed Front Wheel) |
| Clicgear | 8.0 | Clicgear (TWO Fixed Front Wheels) |
| Clicgear | 8+ | Clicgear (TWO Fixed Front Wheels) |
| Eze Glide | Smartfold | CaddyTek / TourTrek (NOT Auto+ 360) |
| KVV | GL307 | CaddyTek / TourTrek (NOT Auto+ 360) |
| KVV | GT302 (360 Rotating Front Wheel) | CaddyTek / TourTrek (NOT Auto+ 360) |
| Motocaddy | Cube | Bigmax IQ |
| Omada | TriLite | Axglo |
| Powacaddy | Micra | Bigmax IQ |
| Qwik-Fold | 360 | CaddyTek / TourTrek (NOT Auto+ 360) |
| Rovic | RV1C | Clicgear Rovic (SMALL Front Wheel) |
| Rovic | RV1D | Clicgear Rovic (SMALL Front Wheel) |
| Rovic | RV1S | Clicgear Rovic (SMALL Front Wheel) |
| Skymax | Cube Golf 3.0 | Bigmax IQ |
| Stewart | R1-S | Clicgear Model 8.0 |
| Sun Mountain | Micro Cart | Sun Mountain Micro Cart / Pathfinder |
| Sun Mountain | Pathfinder 3 / PX3 | Sun Mountain Micro Cart / Pathfinder |
| Sun Mountain | Pathfinder 4 / PX4 | Sun Mountain Micro Cart / Pathfinder |
| Sun Mountain | Speed Cart V1R | Sun Mountain Speed Cart |
| Sun Mountain | Speed Cart SV1 | Sun Mountain Speed Cart |
| Sun Mountain | Speed Cart V1 | Sun Mountain Speed Cart |
| Sun Mountain | Speed Cart GX | Sun Mountain Speed Cart |
| Tang Kula | 3-Wheel Push Cart | CaddyTek / TourTrek (NOT Auto+ 360) |
| TGW | Tour Swivel | CaddyTek / TourTrek (NOT Auto+ 360) |
| TourTrek | 2018 Cruiser | CaddyTek / TourTrek (NOT Auto+ 360) |
| TourTrek | Caddy Cruiser One V3 | CaddyTek / TourTrek (NOT Auto+ 360) |
| Other | iCart Uno golf trolley | CaddyTek / TourTrek (NOT Auto+ 360) |
| Clicgear | 4.5 | Clicgear (LARGE Fixed Front Wheel) |
Watch out The CaddyTek CaddyLite Auto+360 uses the "CaddyTek / TourTrek (Auto+360) (New)" bracket. Every other supported CaddyTek uses the "CaddyTek / TourTrek (NOT Auto+ 360)" bracket. If you are unsure, contact Alphard Golf Customer Service before installing.
Clicgear brackets are distinguished by the front-wheel configuration. Models 2.0, 3.0, 3.5+, 4.0 and 4.5 use "Clicgear (LARGE Fixed Front Wheel)". Models 8.0 / 8+ use "Clicgear (TWO Fixed Front Wheels)". The Rovic RV1 series uses "Clicgear Rovic (SMALL Front Wheel)".
Carts that are NOT compatible
No bracket is available for these carts:
BagBoy: Cart Express GX, Express DLX, Express LE, Quad Plus, SC-545, Spartan, Spartan XL.
BigMax: Autofold FF, Autofold X2, Basic, Blade IP, Blade Quattro, Blade Trio, Junior Max 3W, Junior Max Tiger, Ti Lite, Ti Two, Z360.
CaddyTek: CaddyLite 11.5 V2, CaddyLite 11.5 V3, CaddyLite Compact, Caddymatic.
Clicgear: 6.0 and 6.0+ (model 8 / 8+ is a different cart and is supported — see the table above).
Others: Inesis 900, Izzo 3-Wheel, JEF World of Golf EZ Fold 360, JEF EZ Fold 4, KVV GL303, Masters 5 Series 3, Maxfli 3-Wheel 360, Maxfli ATV 360, Qwik-Fold 4-Wheel, Rovic RV2L, Rovic RV3J Junior, Rovic RV3F, Stinger SG-6, Stonehaven Glide Quad, Sun Mountain Ridgeline 3, Sun Mountain Reflex, TGW The Weekender, TourTrek ATV 360, Goplus 3-Wheel, PGM Golf Pull Cart, PowaKaddy DLX Lite FF, Ray Cook RCX-4, TPX C4 pull cart, TriTrac.
Cart not listed? Email contact@alphardgolf.com with your cart's brand, model, the measurement between the back wheels (axle to axle), and photos of the rear wheels, the cart from behind, and a side view. You can also share a product link. We'll get back to you within 1–2 business days.
Setting Up at the Course (Speedlock)
First time The default stopper-plate position is hole #4, the widest extension setting. Before your first round, use the Stopper Plate Adjustment section to find the best position for your cart. The adjustment requires a Phillips screwdriver.
Orientation Stand behind the cart. The V2 logo and green "CORRECT SIDE TO FACE USER" sticker should face you. The wheelie bar marked "V2PRO" is on the left, the one marked "SPDLOC" is on the right, and the V2Pro carry handle points towards the cart's front wheel.
Where the Power Button is The main Power Button is on the front panel near the V2 logo. It is the round, slightly recessed button to the right of the circle of seven small lights. Press and hold it for about 2 seconds until the lights come on; a quick tap will not switch on the V2Pro.
- Unfold your push cart.
- Pull the extension tube out until it reaches the stopper plate.
- Rotate both Speedlock wheelie bars underneath the body of the V2Pro.
- Position the cart's C-shaped clamp assemblies over the Speedlock wheelie bars.
- Pivot the wheelie bars outward from underneath the V2Pro to lock the clamps onto the cart. This should not require force; if a bar does not rotate freely, stop and check that the V2Pro is positioned correctly.
- Verify the connection: each clamp should click into place. Lift the back of the cart slightly; its rear wheels should lift with the cart without the cart separating from the V2Pro.
- Switch it on. Press and hold the Power Button for about 2 seconds. The red power light and the five battery-level indicators will light. The amber Gyro light beside the Power Button will flash for a few seconds, then remain lit.


Warning Only open or pivot the wheelie bars from the side with the GREEN STICKER.
The wrong side is the one carrying the yellow label. Pivoting from there can damage the Speedlock system and void the warranty. Green label facing you, yellow label away — check that before you pivot the bars.
Uninstalling the V2Pro after a round
Removal follows the setup procedure in reverse. The Speedlock is designed to be installed and removed every round. Always rotate the wheelie bars from the green-sticker side to prevent damage.
- Stop the cart, then press and hold the Power Button until the panel lights go out.
- Stand behind the cart so the green "CORRECT SIDE TO FACE USER" sticker faces you.
- Fold both wheelie bars underneath the V2Pro to release the clamps.
- Lift the cart clear of the V2Pro. Leave the cart brackets fitted for next time.
Fitting the Speedlock Upgrade Kit to an older Club Booster instead? See the Video Library.
Using the Controller
Practice in an open area until you are comfortable accelerating, decelerating, steering and stopping. The remote has a working range of about 50 yards and may reach more than 100 yards in some conditions. Two-way communication stops the cart if it goes out of range, but always keep the cart in your line of sight.

Go / Speed Up
Press to move forward and step through the six speed levels. Whenever the cart restarts from a stop, it begins at the lowest speed. Use the lowest speed near greens and tee boxes.
Stop
Press to bring the V2Pro to a gradual stop. The cart slows before coming to rest and does not halt immediately, so press Stop early when approaching a bunker, water, cart path or green.
Reverse / Speed Down
While the cart is moving, each press lowers the speed by one level. While it is stationary, press and keep the button held to reverse; release it to stop.
Steering
While moving at Speed Level 1 or higher, hold Left or Right for a smooth turn. Quick taps can cause jerking. Fixed-wheel carts may be difficult to steer at Levels 3–6, so slow down and allow a wider turning circle. Swivel-front carts turn more easily.
Gyroscope (G)
Monitors and corrects motor speed so the cart tracks straight over uneven terrain. It is on by default and should normally remain on. Press "G" to disengage it; the amber Gyro light turns off and the cart becomes easier to steer manually.
Distance Timers
Two presets — 15 and 30 yards — automatically stop the cart after the selected distance. You can still steer while a preset is running. To drive without a timer, press Stop, then Go.
Free-Wheel Mode
In tight spaces, hold "Stop" for 3 seconds to release the electronic brake and push by hand — a red light flashes on the unit's face panel, not on the remote. Press any button to restore normal mode. Keep hold of the cart — with the brake released it will roll freely on any slope.
Keypad Lock
Press "Keypad Lock" to lock the buttons — a red light flashes behind the white button. Stop still works while the keypad is locked — every other button is ignored, so you can always halt the cart. Press Lock plus any button within 3 seconds to exit.
Charging the Remote
Connect the supplied Micro USB cord to the remote and a standard USB charging port. Do not use a turbo or fast charger, which may be incompatible. A green light means the remote is charging; it goes out when fully charged. Charge it about once every 2 rounds. The remote LED flashes red when its battery is low.
Hard surfaces Use unpowered Free-Wheel Mode on concrete paths and in parking lots. The cart is designed for powered use on grass; avoiding motor-powered travel on hard surfaces reduces noise, vibration and the chance of fasteners loosening.
Operating video
Using the Controller & Remote (2024 V2 version).
Pairing the Remote
Your Club Booster V2Pro is factory-paired with its remote. If they stop communicating, use this pairing sequence:
- Start with the V2Pro powered off.
- Press and hold "Stop" and "30" on the remote until the red LED in its top-left corner flashes.
- Power on the V2Pro within 3 seconds, while the remote LED is still flashing.
- The red light stops flashing once the remote is paired.
What the red lights mean During normal use, a flashing red LED in the remote's top-left corner indicates a low remote battery. The same LED flashes when you put the remote into pairing mode by holding "Stop" and "30", and stops once pairing succeeds. A flashing red light behind the white Keypad Lock button means the keypad is locked. In Free-Wheel Mode, the flashing red light is on the V2Pro face panel, not the remote (see Using the Controller).
App & Firmware Updates
Use the Alphard Golf app to connect to your V2Pro, install firmware updates and reset the connection password.


- Connect to your V2Pro — pair the app with your Club Booster.
- Firmware updates — keep your cart on the latest software.
- Password reset — set a new six-digit connection password if needed.
On a phone, tap the store link above. On a desktop, scan the code with your phone's camera.
App walkthrough
Using the Alphard Golf App: Pairing, Firmware Update & Password Reset
Connect and update your firmware
- Turn on Bluetooth on your phone, open the app and power on your V2Pro.
- Select "Motorized Caddy 1" or a similar Motorized Caddy device name from the available devices.
- Enter the default password: 123456. A shaded device tab confirms the connection.
- Open Settings and select the firmware version.
- Tap Start upgrade when a newer version is available. Keep the app open and your phone close to the V2Pro until Update success appears.
- If the password is rejected, return to the device list, tap RESET, enter a new six-digit password and tap OK.
Maintenance & Storage

Monthly checks
The V2Pro needs no special monthly maintenance. Check for loose fasteners, especially on parts that move regularly: the wheelie-bar assembly, stopper plate and clamp screws.
After impacts
Check that the wheelie-bar assembly still connects correctly. If operation changes, including stuttering or unresponsiveness, power off the unit and contact Customer Service. Open the front panel only if Customer Service asks you to inspect an internal connection and provides instructions.
Charging temperature
Charge at normal room temperature, ideally 10–30°C (50–86°F). Charging below 10°C / 50°F may reduce the battery's charge capacity.
Winter storage
Charge the battery about once a month as a rule of thumb and do not leave it fully drained, which can damage the cells and shorten battery life. For long-term storage, follow the battery-care guidance.
Cleaning
Course fertilizers and chemicals can be corrosive. Clean regularly with a damp cloth, then dry with paper towels. Keep water away from the Power Button and do not use chemical cleaners.
Battery safety
Never submerge the V2Pro battery or remote. The V2Pro can be used in light rain and wet course conditions, but if it is submerged, do not charge it or try to power it on. Contact contact@alphardgolf.com or call 1 (302) 488-0774. Airlines commonly restrict lithium batteries; ask your airline before travelling, as some allow the battery only in hand luggage.
Troubleshooting
Quick fixes for the most common questions. Still stuck? Email contact@alphardgolf.com.
| Issue | Possible cause | Solution |
|---|---|---|
| Won't power on | Drained or disconnected battery, Power Button fault, or internal power connection issue | Confirm the battery is charged and securely connected. If another compatible V2 unit is available, test the battery in that unit. If the battery works but this V2Pro remains off, contact Customer Service for guided Power Button and motherboard-connection checks. Do not open the unit or bridge motherboard pins unless Customer Service specifically instructs you. |
| Battery dies before completing 18 holes | Heavy electronic-brake use, an overloaded bag, wheel drag, charging outside the recommended temperature, a battery-protection shutdown, or undercharging | On an incline, park across the slope so the motors do not have to hold the cart in place. Check that nothing rubs against any wheel, including the front wheel, and keep the bag load at or below 33 lb (15 kg). Charge indoors at 10–30°C / 50–86°F after every round until the LED turns green (about 4 hours; at least 5 hours before first use), and top up before the next round. |
| Charger LED stays green when connected to the battery | The charging plug is not fully connected, the battery is already full, or the battery cannot accept a charge | Use the supplied charger and confirm that the outlet has power and the charger block shows green. Check the battery-level indicators when the V2Pro is powered on; a full battery keeps the charger LED green. Inspect the three charging pins for damage or obstruction, reconnect the plug and watch whether green briefly changes to red. If the issue continues, email contact@alphardgolf.com with the results of these checks. |
| Cart does not respond to the remote, or stops on its own | The Keypad Lock is engaged; the remote battery is flat or out of range; the remote needs pairing, is paired to another controller such as Sidekick, or the app is connected; or a 15 / 30-yard timer is running | Unlock the keypad if only Stop responds and the lock light flashes (press Keypad Lock plus any button within 3 seconds). Charge the remote, move within about 50 yards, and re-pair it; if the app is connected, turn off Bluetooth on the phone. If a distance timer is running, press Stop and then Go to drive without the timer. If the problem continues, contact Customer Service. |
| V2Pro is on and the remote responds, but the cart will not drive | Free-Wheel Mode may be engaged; a red light flashes on the V2Pro face panel | In Free-Wheel Mode the electronic brake is released. Press any remote button to restore normal drive mode. |
| Slow to turn, wide turning circle, or front wheel drags sideways | A fixed-front-wheel cart naturally turns less easily; on a swivel-front-wheel cart, the swivel lock may be engaged | Slow to Speed Level 1 or 2 and allow a wider turning circle. Check the swivel lock on a swivel-front-wheel cart. Some cart models may also support a swivel conversion kit; contact Customer Service to confirm. |
| Doesn't track straight / pulls to one side | The Gyroscope is off, the V2Pro is not seated squarely because of the stopper position, clamps or bracket bolts are loose, or the cart's front-wheel tracking needs adjustment | Enable the Gyroscope with the "G" button; the amber light remains on when active. Check that the stopper position prevents side-to-side movement along the axle, and tighten the clamps and bracket bolts every few rounds. Follow the push-cart manufacturer's instructions to adjust front-wheel trim. |
| Cart resists turning and is hard to move in tight spaces | This is normal while the electronic brake is active | Hold "Stop" for 3 seconds to enter Free-Wheel Mode, then press any button to restore normal operation. |
| Brackets do not align with the cart's rear-wheel strut holes | The bracket is cart-specific and may be the wrong type | Confirm that the box SKU matches the bracket selected for your cart; it should resemble BRA-XXX-PRO. Check the Compatibility Finder. If the cart is not listed or you need an exchange, email contact@alphardgolf.com. |
| Wheelie bars will not lock the clamps, or feel very loose | The locking block is not moving with the wheelie bar, or the wheelie-bar assembly is mounted backwards | Check the orientation in Setup and rotate only from the green-sticker side. If a wheelie bar was overextended in the wrong direction, it may need replacement; email Customer Service with photos of the problem. |
| No room to set the stopper plate, or the cart does not extend far enough | The extension tube is not positioned for the required stopper setting | Push the axle slightly into the main body to create room for the required position. If the cart still cannot extend far enough, remove the stopper plate before repositioning it, then reinstall and secure it as shown in Stopper Plate Adjustment. |
| Excessive vibration or rattling during use | Loose bolts or screws on the clamp assembly, wheelie bars, stopper plate or frame | Check fastener tightness periodically. Keep to grass and avoid powered use on paved paths or parking lots, where stronger vibration can loosen hardware more quickly. |
Still stuck? Email contact@alphardgolf.com or call 1 (302) 488-0774 (Mon–Fri 10 AM–6 PM ET). Include your order number, your push cart brand and model, and a short video of the problem. We reply within 1–2 business days.
Specifications & Manuals
| Item | Value |
|---|---|
| Battery | 20 lithium-ion cells, 192.4 Wh max (UN38.3, IEC62133) |
| Charger input | 100–240 VAC, 50/60 Hz |
| Charger output | 42 VDC, 1.5 A max |
| Charging temperature | 10–30°C (50–86°F) |
| First charge | At least 5 hours before first use |
| Full charge time | About 4 hours |
| Speed levels | 6 |
| Distance timers | 15 and 30 yards |
| Remote range | ~50 yards rated (often 100+) |
| Communication | Two-way; auto-stops when out of range |
| Stabilization | Gyroscope (tracks straight) |
| Compliance | FCC, IC, CE, C-TICK |
Manuals
This digital guide is the quick, current reference for setup, everyday operation and troubleshooting. The full manual provides the formal safety, compliance and warranty information in one downloadable document.
Common Questions
What is the difference between the V2 and V2Pro?
The V2Pro includes the Speedlock wheelie-bar system for securing the push cart to the Club Booster. The older V2 uses a Y-shaped clamp handle and separate wheelie bars that are fitted after setup. Both versions carry a V2 logo on the front panel. On a V2Pro, standing behind the cart, the left wheelie bar is printed "V2PRO" and the right one "SPDLOC". V2Pro units have shipped with black and light-gray clamps; if you have both colours available, use the clamp colour that matches the wheelie-bar assembly.
What is the V2Pro Upgrade Kit?
Current V2Pro units leave the factory with Speedlock fitted. The V2Pro Upgrade Kit lets owners add the Speedlock system to an older V2. The Upgrade Kit videos in the Video Library apply only to that conversion.
Does it matter which way round the V2Pro is mounted?
Yes. The carry handle must point towards the cart's front wheel and the Power Button must face upwards. Stand behind the cart so the green "CORRECT SIDE TO FACE USER" sticker faces you, then rotate the bars outward to lock and back underneath the body to release. Rotating from the wrong side can damage the Speedlock system and void the warranty. See Setup.
What should I do before taking the V2Pro out for the first round?
Charge for at least 5 hours before first use, even if the charger LED has already turned green. After the initial charge, a full charge from a low level takes about 4 hours; disconnect the charger when its LED changes from red to green. Practise starting, stopping and turning in a controlled open area. Do not routinely leave a full battery connected to the charger; do so only after it has accidentally run completely flat or when Customer Service directs you.
What is the stopper plate, and when should I adjust it?
The stopper plate is a small metal plate on the axle that limits how far the V2Pro opens. Set it during first setup so the axle stops at the correct width for your cart. It has four positions (#1–#4); see Stopper Plate Adjustment for known cart settings and the step-by-step procedure.