
V2 or V2Pro — which do I have?
Two quick looks tell you — and don't go by the “V2” badge, because every unit has it. This guide covers the Club Booster V2.
Look at the two arms near the small ground rollers at each end of the drive unit. Is there white printing on them?
Printed “V2PRO” (left) and “SPDLOC” (right)
You have the Speedlock system = V2Pro. Go to step 2 to find your exact version.
Plain, with no printing
You have a base V2 — you also tighten a hand cam lever and your push cart keeps bolted brackets. You're on the right guide.
A base V2 also has wheelie bars — they're just unlabeled. Decide on the printing, not on whether arms are present.
Only if you saw “V2PRO” / “SPDLOC”: look at the two clamps gripping the axle, plus the console sticker.
Light-gray clamps + a green “CORRECT SIDE TO FACE USER” sticker + one adjustable stopper plate
Factory V2Pro (A11). Use the V2Pro guide.
Black clamps marked “L” / “R” + four separate stopper plates
You added the Speedlock Upgrade Kit to a V2. Follow the Speedlock upgrade-kit steps below. For replacement parts (battery, brackets) you're still on the V2 line.
| Look at | Base V2 | V2Pro (Speedlock) |
|---|---|---|
| Wheelie-bar arms | Plain, unlabeled | Printed “V2PRO” / “SPDLOC” |
| Locks onto the cart | Tighten a hand cam lever | Pivot the arms — no tools |
| Brackets on your cart | Bolted on, stay behind | None — clamps lift off with the unit |
| Stopper plate | None | Yes |
| Course setup | Slower, every round | About a minute: place, pivot, go |
What's in the Box
Before your first use, read this guide in full and check that all components are present.
Club Booster V2
The main power unit.
Left & Right Brackets
With (4) bolts, (4) washers and (4) nuts. Brackets are specific to your cart brand and model.
Remote Control Unit
Drives the cart wirelessly.
Remote Control Mount
Holds the remote on your cart.
Battery Charger
Use only the supplied charger.
Micro USB Charging Cable
For charging the remote controller.
Wheelie Bars
Stability bars fitted to the unit.
Charging the Battery
The battery ships at a very low charge. Charge for at least 5 hours before your first round so it lasts the full 18 holes.

Charger
Input 100–240 VAC, 50/60 Hz. Output 42 VDC, 1.5 A max. Use only the manufacturer-supplied charger.
Temperature
Charge between 10–30°C (50–86°F). Charging below 10°C / 50°F may damage the battery cells.
Installing the Brackets
Brackets are specific to a cart brand and model. Confirm the brand and model on the box match your cart before installing — see the Compatibility finder.
Tools you'll need
Phillips screwdriver, and an open-end, adjustable, or socket wrench (for the wheel nut, strut pivot nut, and bracket nut).
Before you start
If your push cart has a rear-wheel braking mechanism, remove it before removing the rear wheels.
Bracket installation videos (by cart model)
Find your cart, then follow along.
Clicgear (3-Wheel Model)
Rovic (RV1S / RV1C)
Sun Mountain Speed Cart
Sun Mountain Micro Cart
Bagboy (Quad XL & Compact 3)
Bagboy Tri-Swivel
CaddyTek & TourTrek (3-Wheel 360)
Bracket Compatibility Finder
Type your push cart brand or model to find the exact bracket to select at checkout. Choosing the right bracket ensures a proper fit and easy installation. (Compatibility list v2025/06.)
| Brand | Model | Bracket to select |
|---|---|---|
| Alphard Golf | Duo Cart | Alphard Duo |
| Axglo | Flip n' Go Pro | Axglo |
| Axglo | V3 | Axglo |
| Axglo | V2 | Axglo |
| BagBoy | Compact 3 | Bagboy Nitron / Quad XL / Tri-Swivel |
| BagBoy | Nitron | Bagboy Nitron / Quad XL / Tri-Swivel |
| BagBoy | Quad XL | Bagboy Nitron / Quad XL / Tri-Swivel |
| BagBoy | Tri-Swivel | Bagboy Nitron / Quad XL / Tri-Swivel |
| BagBoy | Tri-Swivel II | Bagboy Nitron / Quad XL / Tri-Swivel |
| BigMax | Cube | Bigmax IQ |
| BigMax | IQ | Bigmax IQ |
| BigMax | IQ 360 | Bigmax IQ |
| BigMax | IQ² | Bigmax IQ |
| BigMax | IQ² 360 | Bigmax IQ |
| CaddyTek | 360 | CaddyTek / TourTrek (NOT Auto+ 360) |
| CaddyTek | 1-Click 4-Wheel | CaddyTek / TourTrek (NOT Auto+ 360) |
| CaddyTek | Caddy Cruiser One Tour | CaddyTek / TourTrek (NOT Auto+ 360) |
| CaddyTek | Caddy Cruiser ONE V8 | CaddyTek / TourTrek (NOT Auto+ 360) |
| CaddyTek | CaddyLite Auto+360 | CaddyTek / TourTrek (Auto+360) (New) |
| CaddyTek | CaddyLite EZ Tour | CaddyTek / TourTrek (NOT Auto+ 360) |
| CaddyTek | CaddyLite EZ Version 8 | CaddyTek / TourTrek (NOT Auto+ 360) |
| CaddyTek | CaddyLite ONE Swivel V8 | CaddyTek / TourTrek (NOT Auto+ 360) |
| CaddyTek | Explorer V8 SuperLite | CaddyTek / TourTrek (NOT Auto+ 360) |
| CaddyTek | EZ Fold | CaddyTek / TourTrek (NOT Auto+ 360) |
| CaddyTek | Leopard | CaddyTek / TourTrek (NOT Auto+ 360) |
| CaddyTek | Panther | CaddyTek / TourTrek (NOT Auto+ 360) |
| CaddyTek | The Explorer Version 8 | CaddyTek / TourTrek (NOT Auto+ 360) |
| Clicgear | 2.0 | Clicgear (LARGE Fixed Front Wheel) |
| Clicgear | 3.0 | Clicgear (LARGE Fixed Front Wheel) |
| Clicgear | 3.5 | Clicgear (LARGE Fixed Front Wheel) |
| Clicgear | 4.0 | Clicgear (LARGE Fixed Front Wheel) |
| Clicgear | 8.0 | Clicgear (TWO Fixed Front Wheels) |
| Clicgear | 8+ | Clicgear (TWO Fixed Front Wheels) |
| Eze Glide | Smartfold | CaddyTek / TourTrek (NOT Auto+ 360) |
| KVV | GL307 | CaddyTek / TourTrek (NOT Auto+ 360) |
| KVV | GT302 (360 Rotating Front Wheel) | CaddyTek / TourTrek (NOT Auto+ 360) |
| Motocaddy | Cube | Bigmax IQ |
| Omada | TriLite | Axglo |
| Powacaddy | Micra | Bigmax IQ |
| Qwik-Fold | 360 | CaddyTek / TourTrek (NOT Auto+ 360) |
| Rovic | RV1C | Clicgear Rovic (SMALL Front Wheel) |
| Rovic | RV1D | Clicgear Rovic (SMALL Front Wheel) |
| Rovic | RV1S | Clicgear Rovic (SMALL Front Wheel) |
| Skymax | Cube Golf 3.0 | Bigmax IQ |
| Stewart | R1-S | Clicgear Model 8.0 |
| Sun Mountain | Micro Cart | Sun Mountain Micro Cart / Pathfinder |
| Sun Mountain | Pathfinder 3 / PX3 | Sun Mountain Micro Cart / Pathfinder |
| Sun Mountain | Pathfinder 4 / PX4 | Sun Mountain Micro Cart / Pathfinder |
| Sun Mountain | Speed Cart V1R | Sun Mountain Speed Cart |
| Sun Mountain | Speed Cart SV1 | Sun Mountain Speed Cart |
| Sun Mountain | Speed Cart V1 | Sun Mountain Speed Cart |
| Sun Mountain | Speed Cart GX | Sun Mountain Speed Cart |
| Tang Kula | 3-Wheel Push Cart | CaddyTek / TourTrek (NOT Auto+ 360) |
| TGW | Tour Swivel | CaddyTek / TourTrek (NOT Auto+ 360) |
| TourTrek | 2018 Cruiser | CaddyTek / TourTrek (NOT Auto+ 360) |
| TourTrek | Caddy Cruiser One V3 | CaddyTek / TourTrek (NOT Auto+ 360) |
| Other | iCart Uno golf trolley | CaddyTek / TourTrek (NOT Auto+ 360) |
Carts that are NOT compatible
No bracket is available for these carts:
BagBoy: Cart Express GX, Express DLX, Express LE, Quad Plus, SC-545, Spartan, Spartan XL.
BigMax: Autofold FF, Autofold X2, Basic, Blade IP, Blade Quattro, Blade Trio, Junior Max 3W, Junior Max Tiger, Ti Lite, Ti Two, Z360.
CaddyTek: CaddyLite 11.5 V2, CaddyLite 11.5 V3, CaddyLite Compact, Caddymatic.
Clicgear: 6.0+.
Others: Inesis 900, Izzo 3-Wheel, JEF World of Golf EZ Fold 360, JEF EZ Fold 4, KVV GL303, Masters 5 Series 3, Maxfli 3-Wheel 360, Maxfli ATV 360, Qwik-Fold 4-Wheel, Rovic RV2L, Rovic RV3J Junior, Rovic RV3F, Stinger SG-6, Stonehaven Glide Quad, Sun Mountain Ridgeline 3, Sun Mountain Reflex, TGW The Weekender, TourTrek ATV 360, Goplus 3-Wheel, PGM Golf Pull Cart, PowaKaddy DLX Lite FF, Ray Cook RCX-4, TPX C4 pull cart, TriTrac.
Setting Up Before the Round

Using the Controller
Practice in an open area first to get a feel for accelerating, decelerating, steering and stopping. The remote is rated to about 50 yards and often reaches 100+. Two-way communication stops the cart automatically when the remote is out of range.

Go / Speed Up
Press to move forward. Each press raises the speed by one of six levels.
Stop
Press to halt the cart immediately.
Back / Speed Down
Hold to reverse; release to stop. Also lowers the speed level.
Speed Levels
Six levels, starting at Level 1. After any stop, the next Go restarts at Level 1. Slow to the lowest speed near greens and tee boxes.
Steering
Press Go, then hold Left or Right for smooth turns — quick taps cause jerking. Fixed-wheel carts may not steer at speeds 3–6, so slow down before turns. Turning radius is best at slower speeds.
Gyroscope (G)
Keeps both motors at the same speed so the cart tracks straight. On by default; press "G" to disengage (the yellow LED turns off).
Distance Timers
Two presets — 15 and 30 yards — automatically stop the cart after the selected distance.
Free-Wheel Mode
In tight spaces, hold "Stop" for 3 seconds to release the electronic brake (red LED blinks) and push by hand. Press any button to restore normal mode.
Operating video
Operating the Club Booster V2 & remote control.
Pairing the Remote
Your Club Booster V2 comes factory-paired with its remote. If they stop communicating, you can re-pair manually.
Speedlock Upgrade Kit (Legacy)
These steps are for the original Speedlock upgrade kit (black left/right clamps and four separate stopper plates) that converts a Club Booster V2. Have a factory V2Pro? It ships pre-assembled with the newer Speedlock system — universal gray clamps and one adjustable stopper plate — so see the V2Pro guide instead.
Show the original upgrade-kit installation steps
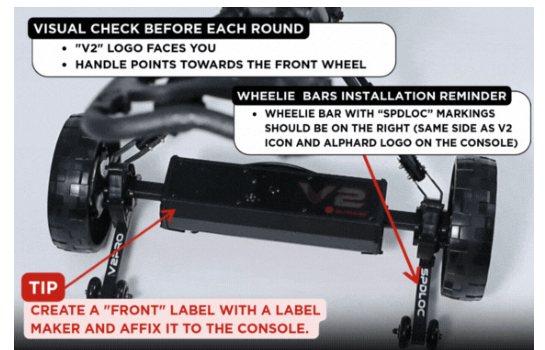
Step 1 — Replace the Clamps
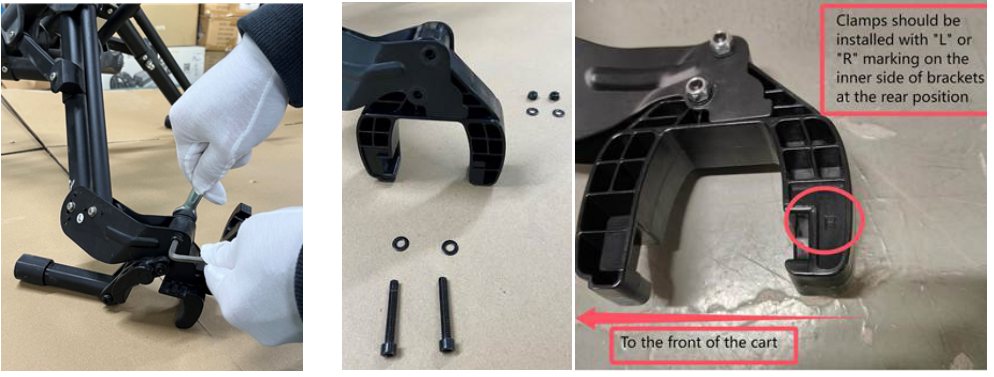
Step 2 — Add the Stopper Plates
The stopper plate sets your axle tube to the right length for your cart, so you don't have to re-adjust the tube length every setup.
| Plate | Length | Suitable for |
|---|---|---|
| 1 | 115 mm | Sun Mountain Micro Cart; Bagboy Quad; Axglo; Bigmax Cube |
| 2 | 93 mm | Sun Mountain Speed Cart; Fastfold; some CaddyTek models |
| 3 | 75 mm | Clicgear M8; Omni Cart; some CaddyTek models |
| 4 | 53 mm | Clicgear M1–4; Rovic RV1S; CaddyLite EZ; some CaddyTek models |
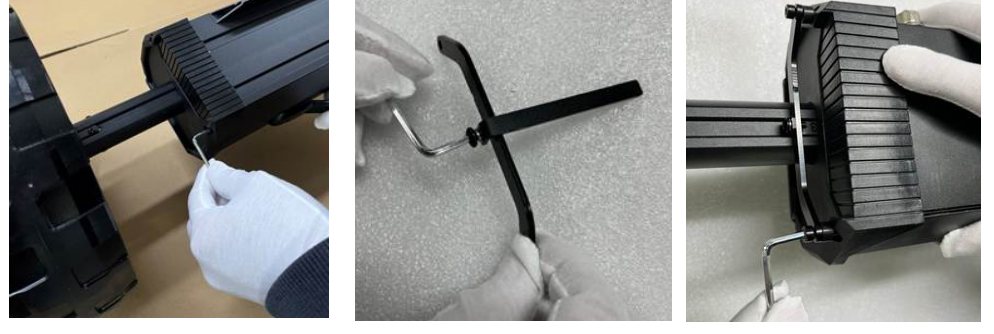
Step 3 — Install the Wheelie Bars
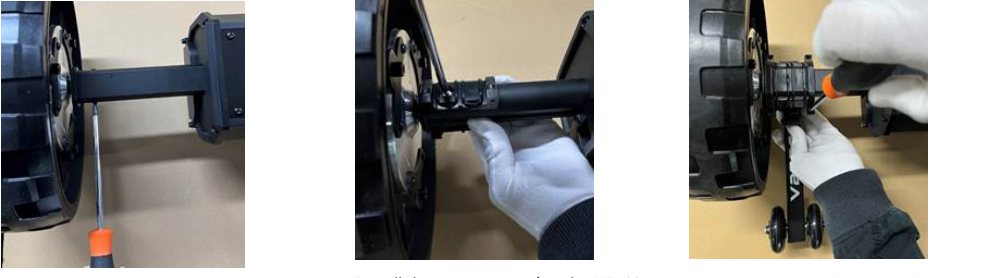
Step 1 video — Replacing the Clamps
Speedlock troubleshooting
| Issue | Possible cause | Solution |
|---|---|---|
| Stopper plate doesn't fit | Wrong plate length for your cart, or installed upside down | Test the alternate plate lengths; watch the step video |
| Wheelie bars won't lock | Bars on the wrong sides ("V2PRO" not on left); console orientation wrong; debris in the clamps | Verify "V2PRO" is on the left; handle must face the cart wheel; clean the clamp mechanism |
| Clamps feel loose | Missing washers (CG3/CAD brackets); screws not through the nylock nuts; wrong clamp orientation | Add washers if needed; tighten until threads emerge; L/R markings must face inward |
| System rattles during use | Loose stopper-plate screws; wheelie bars not fully extended; missing spacers | Retighten the M4×20 screws; pivot the bars until they click; verify all 4 spacers are installed |
Our Smart Phone App
We continuously improve the firmware for a better experience. Update your cart's firmware through the Alphard Golf app.


- Firmware updates — keep your cart on the latest software.
- Better over time — new improvements roll out through the app.
Update your firmware
Maintenance & Storage

Charging temperature
Charge between 10–30°C (50–86°F). Never charge below 10°C / 50°F — it can damage the battery cells.
Winter storage
Fully charge the battery, then remove it from the cart. Keep the cart, controller and charger in a dry, cool place out of direct sunlight, and top the battery up every month.
Cleaning
Course fertilizers and chemicals can be corrosive over time. Clean regularly with a damp cloth. Do not apply any chemicals.
Battery safety
Never submerge the battery or remote. If the unit is submerged, do not air-dry or charge it — contact your distributor. Consult airlines before flying with the battery.
Troubleshooting
Quick fixes for the most common questions. Still stuck? Email contact@alphardgolf.com.
| Issue | Possible cause | Solution |
|---|---|---|
| Won't power on | Battery low or not connected | Charge the battery; make sure it's connected and the console switches on. |
| Remote not responding, or cart stops on its own | Remote out of range (rated ~50 yd) or needs re-pairing | Move closer; re-pair the remote (see Pairing the Remote). |
| Hard to steer, or won't turn at speed | Fixed-wheel cart at higher speeds | Slow to Level 1–2 before turns. Swivel-front carts turn more easily than fixed-wheel models. |
| Doesn't track straight | Gyroscope off, or alignment drift | Enable the gyroscope (press "G"); fine-tune with the alignment adjustment in the app. |
| Hard to move in tight spaces | Electronic brake engaged | Hold "Stop" for 3 seconds for free-wheel mode; press any button to restore. |
| Bracket doesn't fit | Wrong bracket for your cart | Check the Compatibility finder; if not listed, email tony@alphardgolf.com. |
Specifications
| Item | Value |
|---|---|
| Battery | 20 lithium-ion cells, 192.4 Wh max (UN38.3, IEC62133) |
| Charger input | 100–240 VAC, 50/60 Hz |
| Charger output | 42 VDC, 1.5 A max |
| Charging temperature | 10–30°C (50–86°F) |
| First charge | At least 5 hours before first use |
| Full charge time | About 4 hours |
| Speed levels | 6 |
| Distance timers | 15 and 30 yards |
| Remote range | ~50 yards rated (often 100+) |
| Communication | Two-way; auto-stops when out of range |
| Stabilisation | Gyroscope (tracks straight) |
| Compliance | FCC, IC, CE, C-TICK |